Program Cards and the Computer
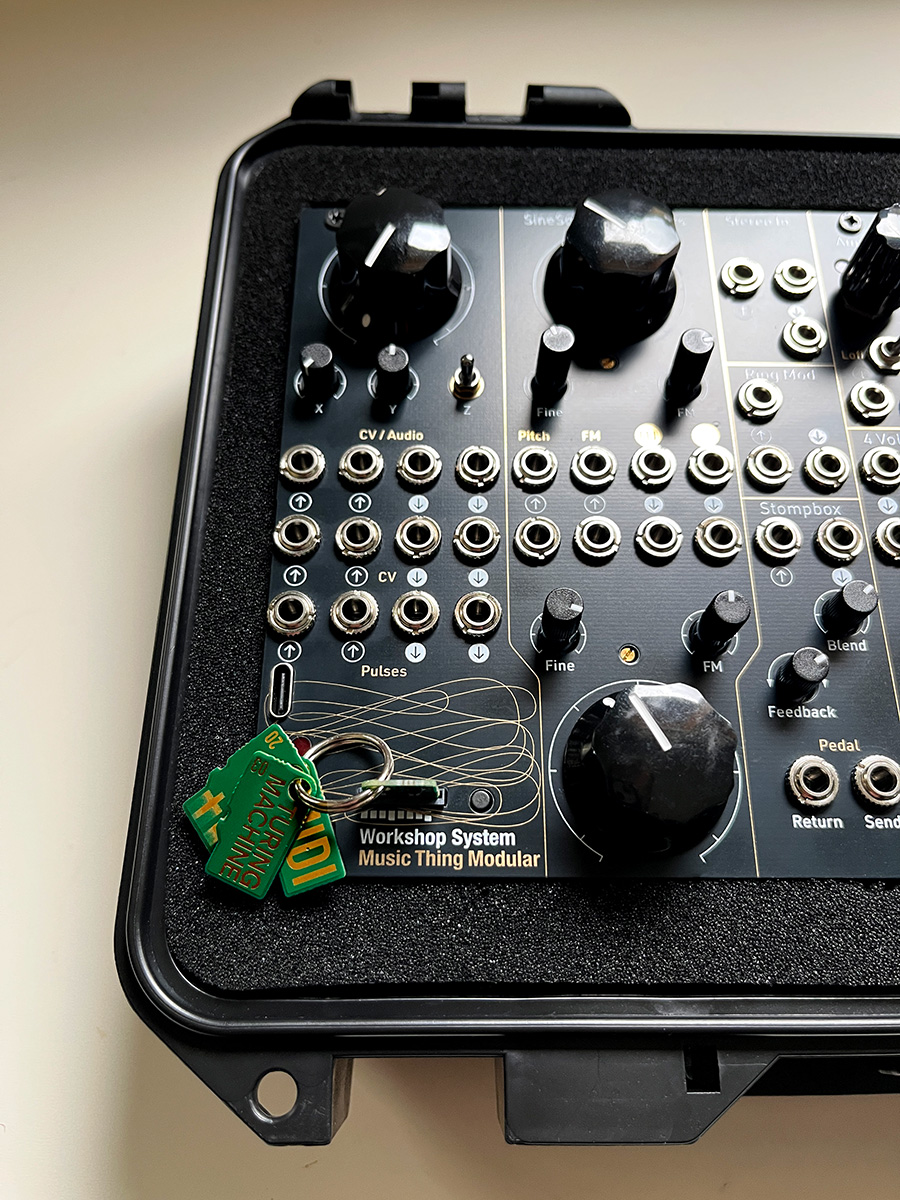
Computer is a simple but capable music computer, inspired by the early music studios like EMS in London and Bell Labs where computers were used to control analog oscillators and filters, compose algorithmic music and generate waveforms.
Computer is powerful enough to do audio effects, sequencing and connecting with other devices over USB.
Computer loads programs stored on tiny custom-made program cards slightly larger than Micro SD cards. It has three pairs of inputs and outputs: for Audio/CV, for precision control voltages for pitch, and for pulses.
To find out about new program cards subscribe to the free Workshop System Newsletter, or join the Workshop System Discord.
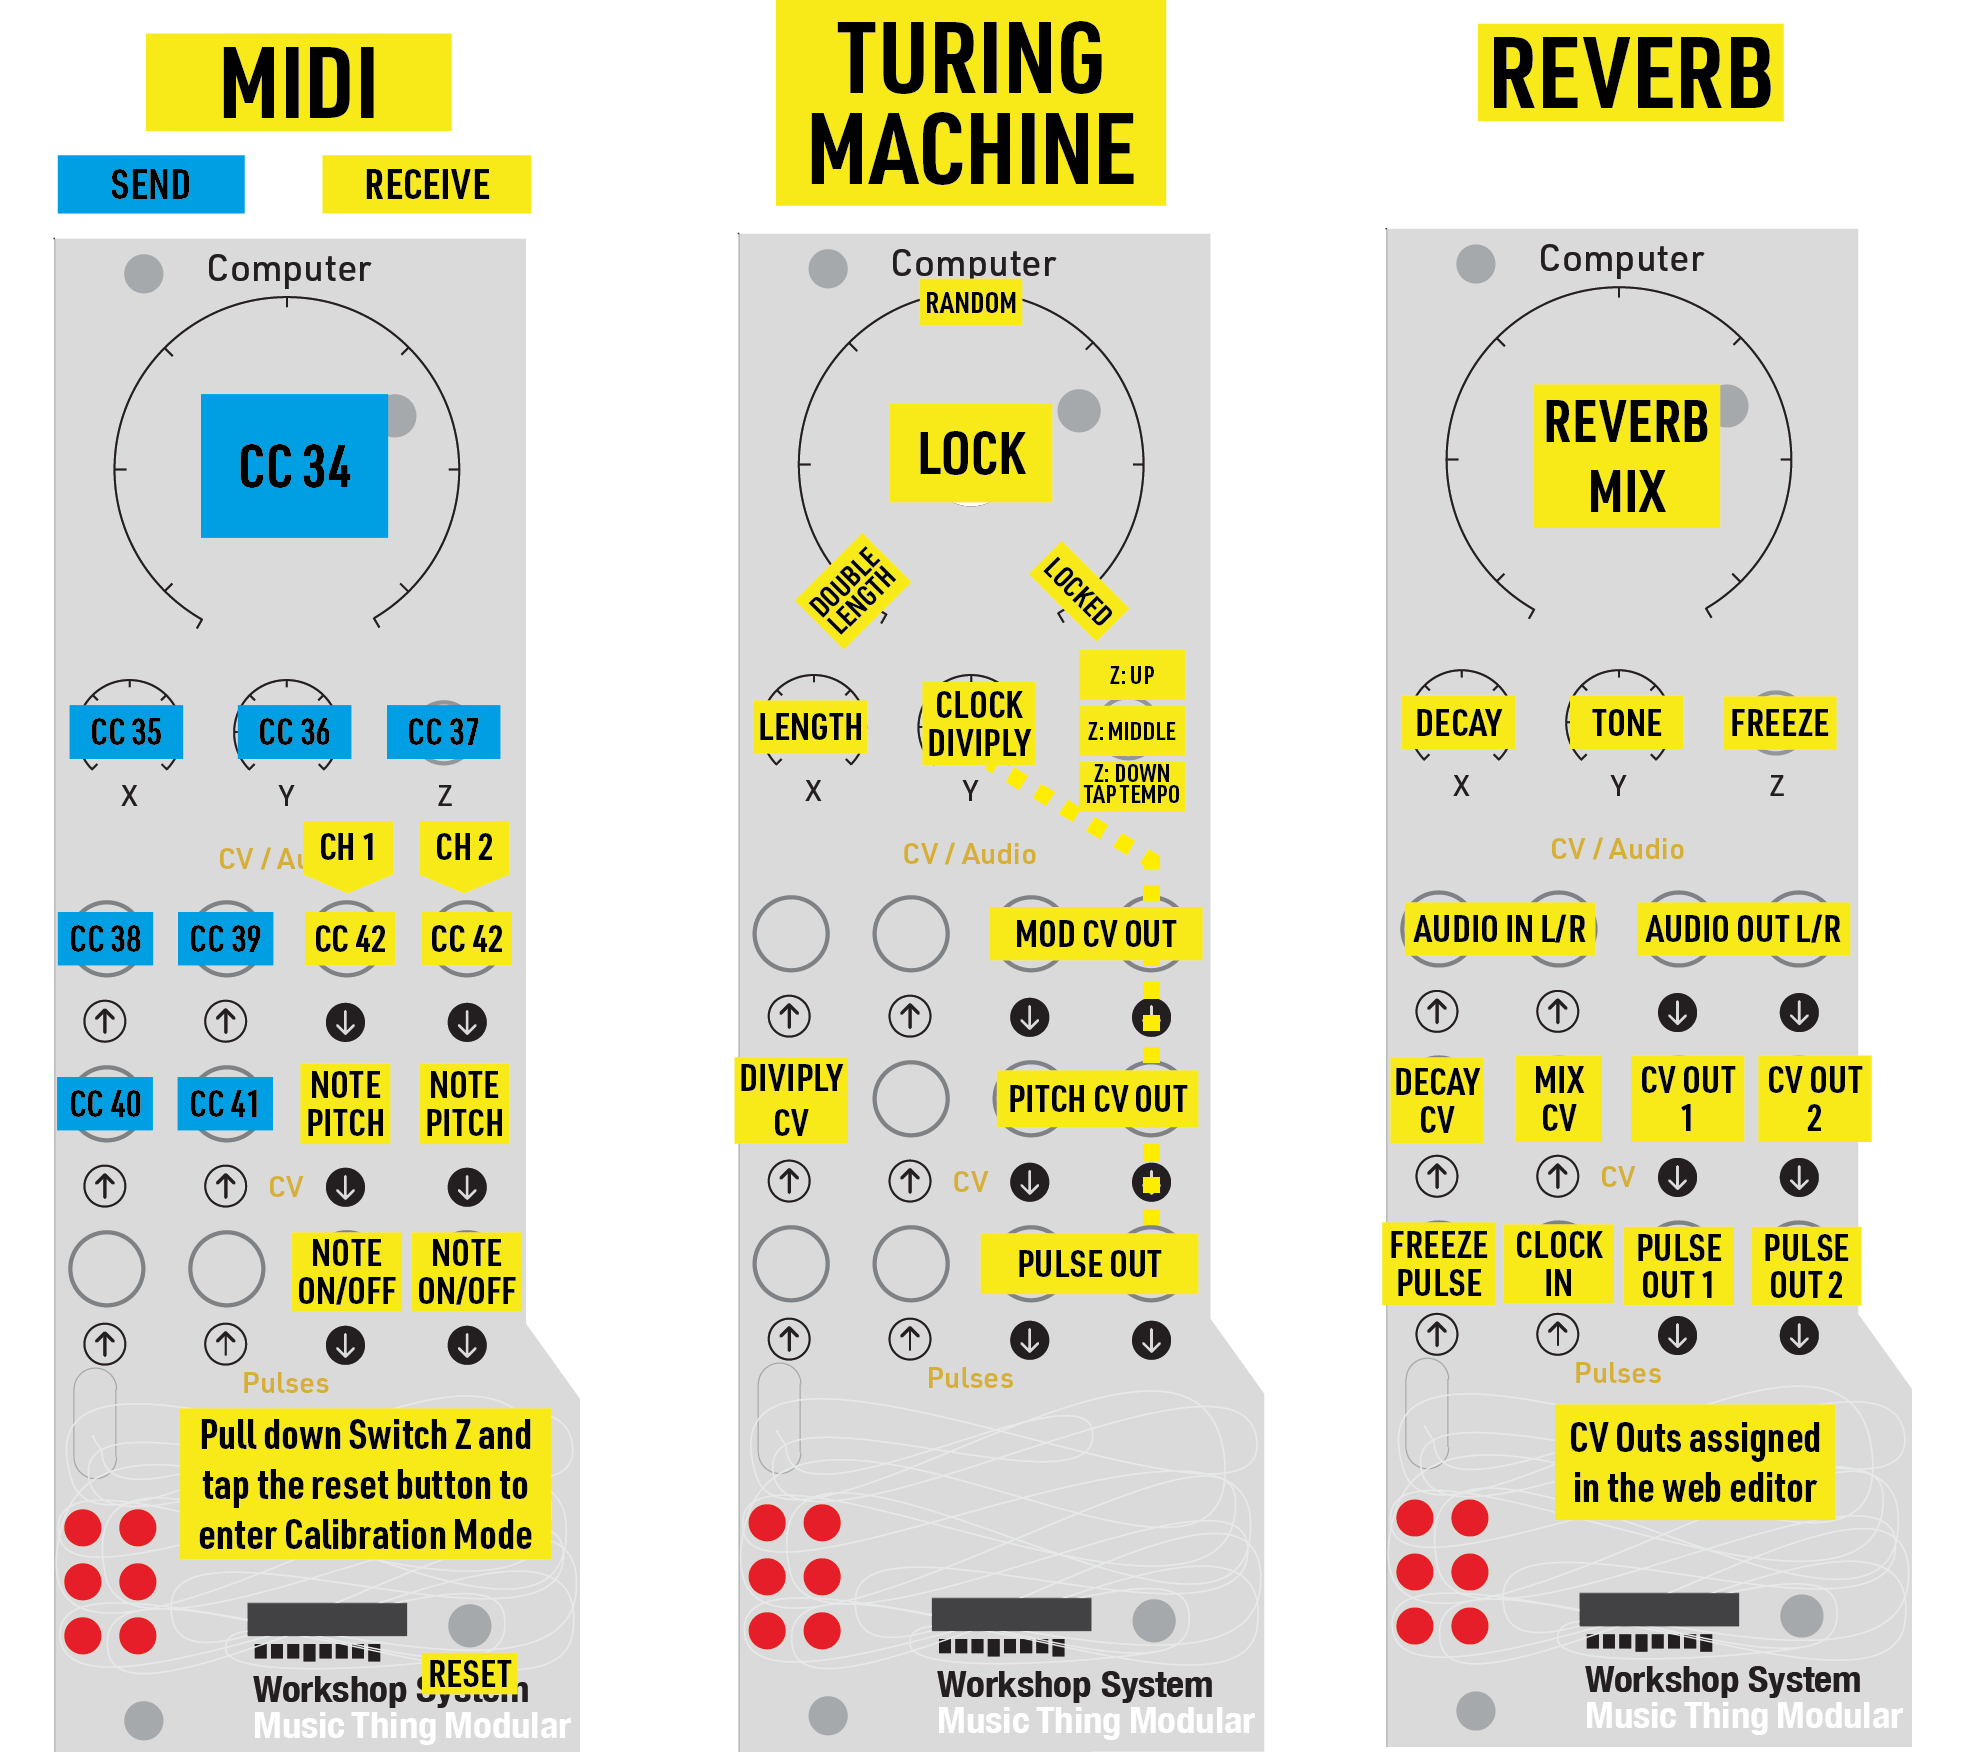
00 Simple MIDI
03 Turing Machine
20 Reverb+
88 Blank 2mb
Program Cards works in progress ←
CLICK HERE TO LEARN HOW TO PROGRAM BLANK CARDS
25 Utility Pair A magical library of 25 great audio effects and utilities that can be combined into 625 different custom-made program cards.
42 Backyard Rain A cozy rain ambience mix for background listening, playing rain ambience which was recorded in Brian’s backyard.
11 Goldfish Goldfish is a fantastic looper / sequencer card, designed in a very modular, patchy way. Really turns the WS into a different instrument. Download link in the video description.
10 Twists A versatile digital oscillator based on Émilie Gillet’s Braids.
37 Compulidean is a very fun Euclidean Sequencer which also features the Workshop System’s first drum machine, with gnarly 808 samples.
55 Fifths a fantastically melodic and quirky quantizer, pitch and pulse sequencer and VCA (Download link in the video description).
08 Bytebeat For generating and mangling rhythmic and melodic bytebeats.
38 OD is a loopy chaotic modulator with fantastically deep documentation.
53 Glitter is a stereo granular looper with a very cool video demo featuring a Yamaha Remie.
78 Talker An early proof of concept: Computer talks like a Speak & Spell.
12 AM Coupler Please do not attempt to use this card. It is illegal in most states.
More work-in-progress program cards at the Workshop Computer github.
Included Program Cards ←
Computer FAQ ←
- How do I use the program cards?
- Insert the card with the gold connector facing down (matching the white symbol below the card slot!).
- Tap the little reset button next to the slot to load the program.
- What’s with the numbers, like 03 Turing Machine?
- Blank cards come with space to write two numbers, so this started as a way for developers to keep track of cards.
- I’m not sure what will happen when we have 99 finished cards.
- I can’t connect to MIDI or the web editor
- Always cycle power, rather than just pressing reset, when connecting to a computer. This ensures that the Workshop Computer connects to the host computer.
- Some USB-C cables are power only, and cannot transmit any data. If you have one of these I’d suggest labelling it or destroying it.
- How do I write a blank program card?
- This video explains how to write blank cards in three minutes
- You will have downloaded a .uf2 file. This is the firmware.
- Pull off the main knob at the top of Computer (it’s stiff at first, gets easier quickly). Behind it you’ll see little button recessed into the panel.
- Put the card you want to write into the card slot. Check it’s the right one. Printed cards are not write protected, so you can write over a Reverb+ as easily as a Blank card.
- Connect a USB-C cable from the front panel USB port to your computer. Cycle power on the Workshop System to ensure the Workshop Computer connects to the computer.
- Hold down the top button, then tap and release the bottom button next to the Program Card slot. If it doesn’t appear, turn the Workshop System off and on and try again.
- A folder called RPI-RP2 will appear on your desktop
- Drag the relevant .uf2 file onto the folder. The folder will disappear, and the firmware is updated.
- Can I power the Computer from the front panel USB socket?
- No, the computer cannot draw power from the front panel USB socket. (The first batch of Workshop Computers in 2024 could be powered from the front panel, but this is no longer true.)
- Can I power USB things from the front panel USB socket?
- Yes, but the power available is limited to ~100mA.
- I’ve lost or damaged my program cards, can I get a replacement?
- Contact Thonk Support
- What is Computer, really?
- Computer’s CPU is a RP2040 32-bit 133mhz dual core microprocessor. It has 264K of RAM. Program cards store either 2mb or 16mb. Program cards contain the entire memory of the Computer, and can be written in any language that is compatible with the RP2040, including Arduino, C++, and Circuit Python.
- Can I write code for Computer and release my own cards?
- Yes, definitely. Start at the Workshop Computer Github, and in the #computer channel on the Discord.
00 Simple MIDI ←
by: Tom Whitwell Version: 0.5.0
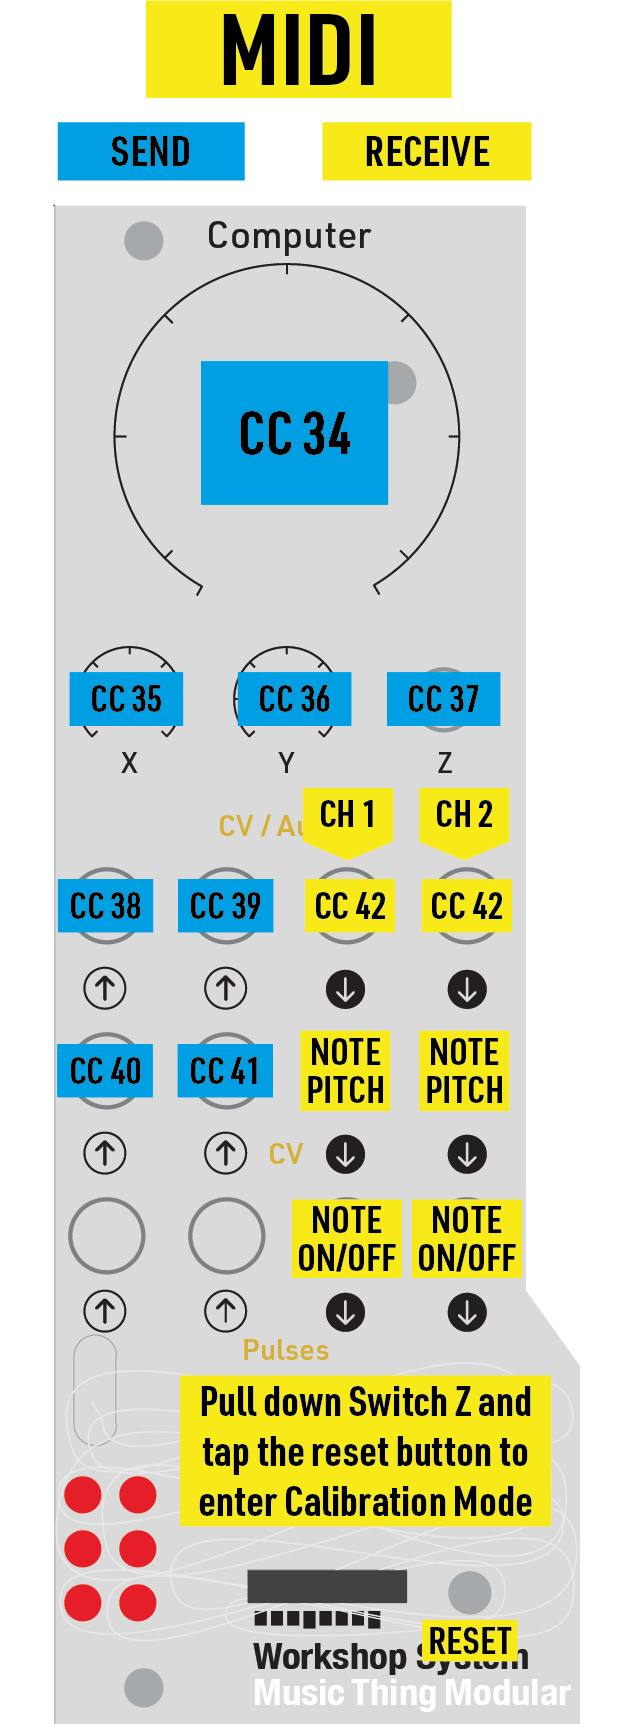
Simple MIDI turns the Computer into a simple USB midi interface to send and receive MIDI.
This Instagram Reel explains the MIDI card in 90 seconds
It receives 2 x channels of MIDI information from the computer: Gate + Note + Continuous Controller.
And it sends 8 channels of MIDI from the system, so you can control the computer from the system:
- 3 Knobs
- 1 Switch
- 4 CV inputs
To connect to MIDI:
- Connect the front panel USB-C connection to a computer with a MIDI sequencer
- Cycle power on the Workshop System to ensure that the Workshop Computer connects to your computer.
- Put the MIDI card into the Computer slot and press the little reset button next to the slot.
- The LEDs should blink very briefly, then stop. The blinking means the card is looking for a computer, and it should find it almost immediately.
- If the LEDs keep blinking, the Computer has not connected over USB.
- Turn the Workshop System power off and on again
- Check you have a USB-C cable that can pass data, not just power
When connected by USB-C to a computer, the Workshop System will show up as Workshop System MIDI, both inputs and outputs.
The MIDI card is also where calibration happens. This card lets you fine-tune the Computer’s CV outputs. Other cards (like Turing Machine and Reverb+) can read that calibration data so they can also play in tune.
Click here for the full calibration process
03 Turing Machine ←
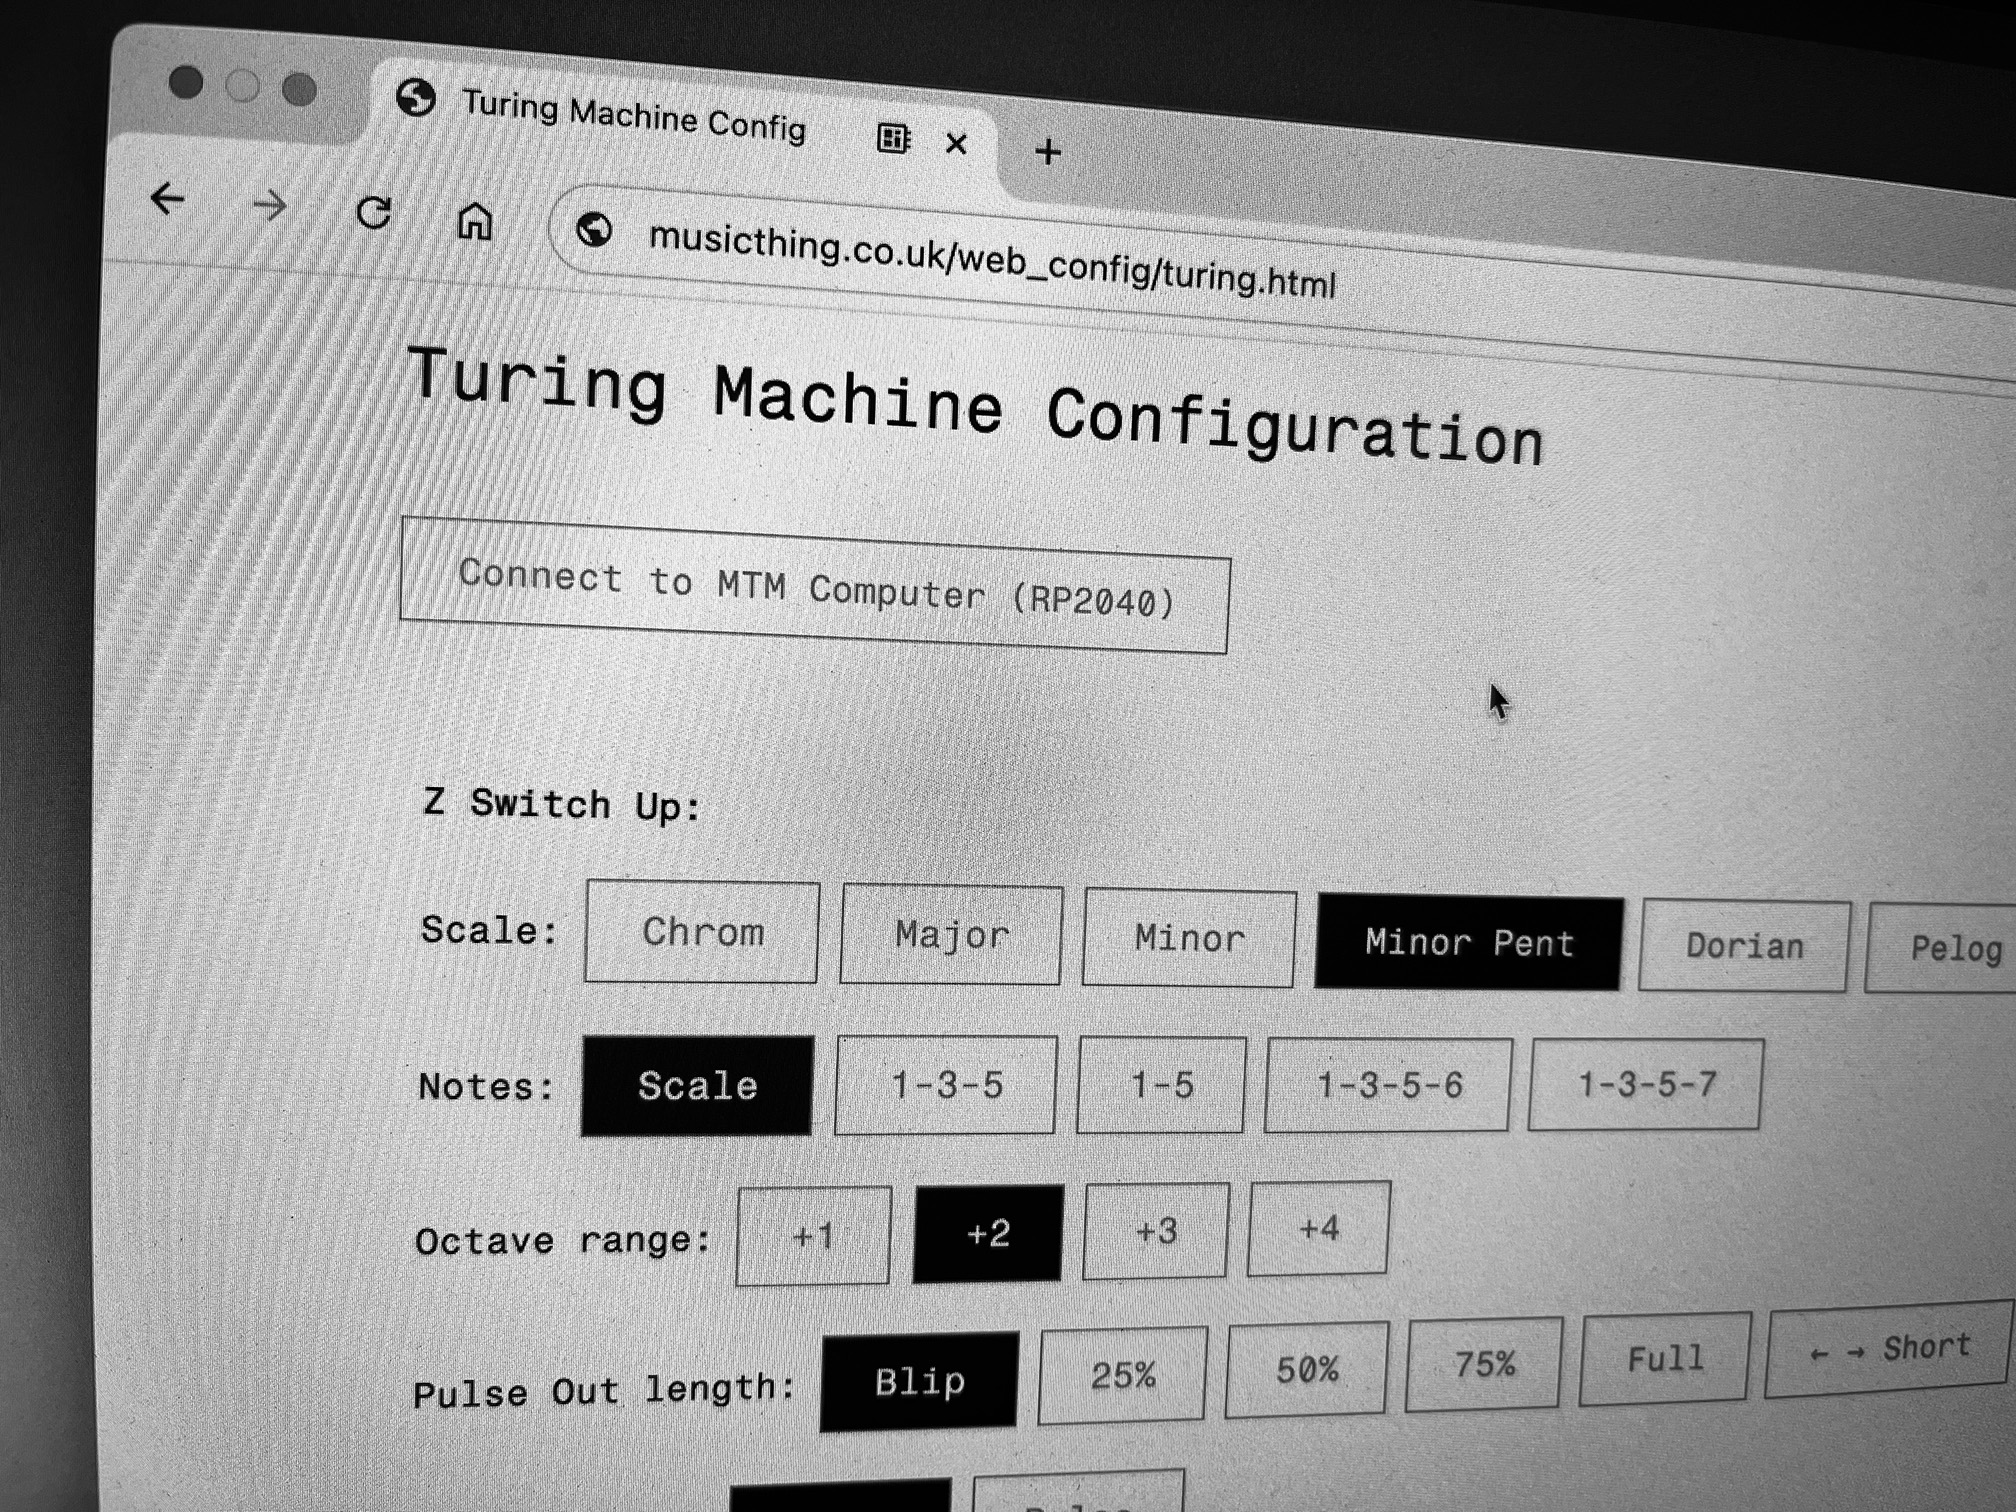
by: Tom Whitwell Version: 0.1.0
Launch the Turing Machine Web Editor
Turing Machine turns the Workshop Computer into a random looping sequencer with two channels and multiple scales.
Here’s a quick demo of the Turing Machine card on Instagram
The Turing Machine was launched by Music Thing Modular in 2012, and is a very popular DIY synth project. Here’s how it works:
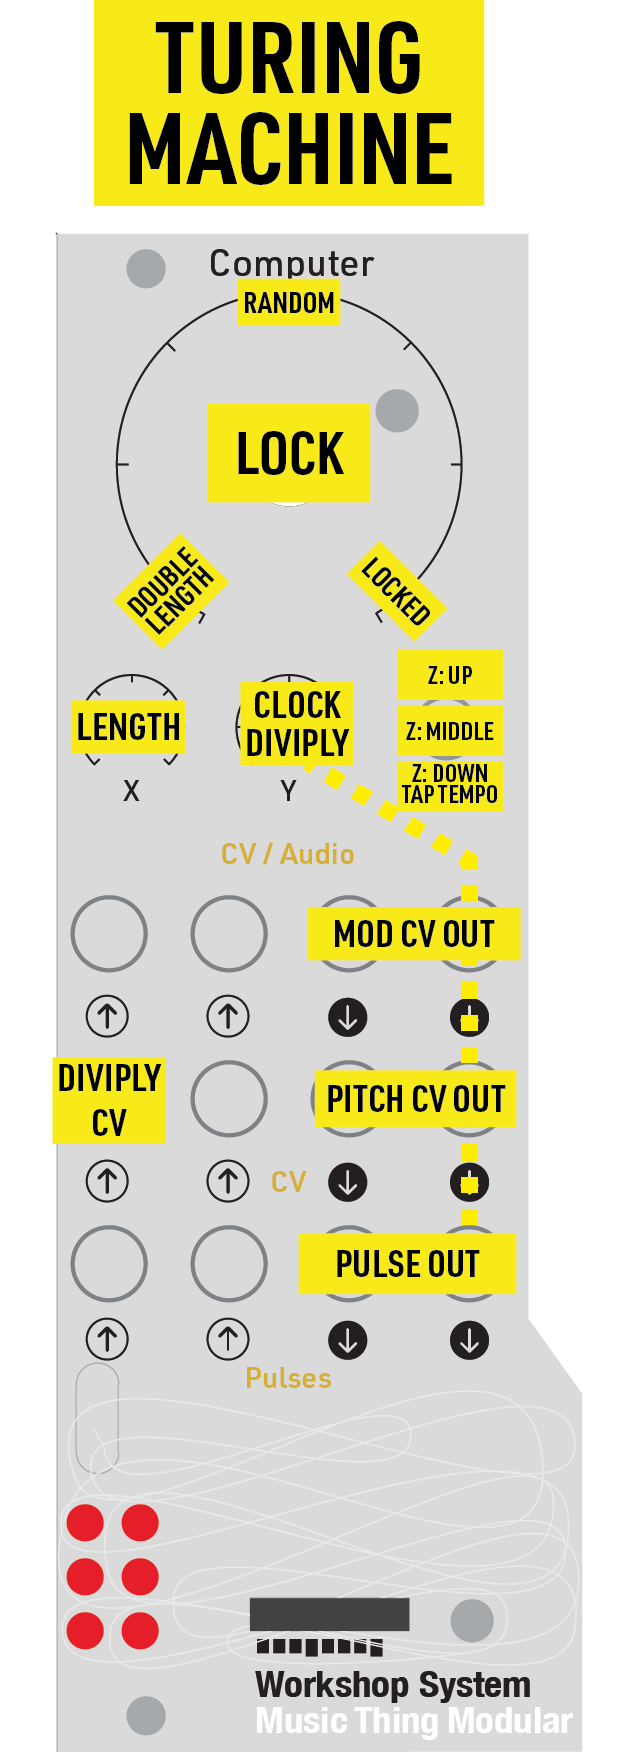
- Clock is set by tapping the Z switch.
- In any Turing Machine, looping is controlled by the big knob.
- At noon, the sequences are random.
- At 5 o’clock, it locks into a repeating sequence.
- At 7 o’clock, it double locks into a repeating sequence twice as long as the ‘length’ setting.
- At 3 o’clock or 9 o’clock, it slips; looping but occasionally changing notes.
- The X knob sets sequence length: 2,3,4,5,6,8,12 or 16 steps, indicated with slightly cryptic LED patterns.
- The Y knob is a Diviply control for the right hand outputs. It divides or multiplies the clock signal
- Flip the Z switch up or down to select different settings for the pitch and pulse outputs. Think of this as two modes which can be set up in the web editor, where you can control scales, pulse lengths and many other things.
- Every program card has a unique serial number. This number is used to initialise the random number system in the Turing Machine. This means that every Turing Machine card will sound slightly different. It also means that if you start a Turing Machine card in locked position, it will always play the same pattern until it is randomised.
The Turing Machine card takes it’s calibration from the MIDI card, so if the pitch outputs aren’t in tune, you’ll need to calibrate the Computer
20 Reverb+ ←
by: Chris Johnson Version: 0.1.0
Reverb+ combines a CV-controllable ‘Hall’ reverb algorithm with a flexible range of other utilities: MIDI to gate/CV, Bernoulli gate, Turing Machine, sample & hold, and two internal clock sources, all with associated clock dividers. These utilities are configured through a browser-based editor.
User Interface ←
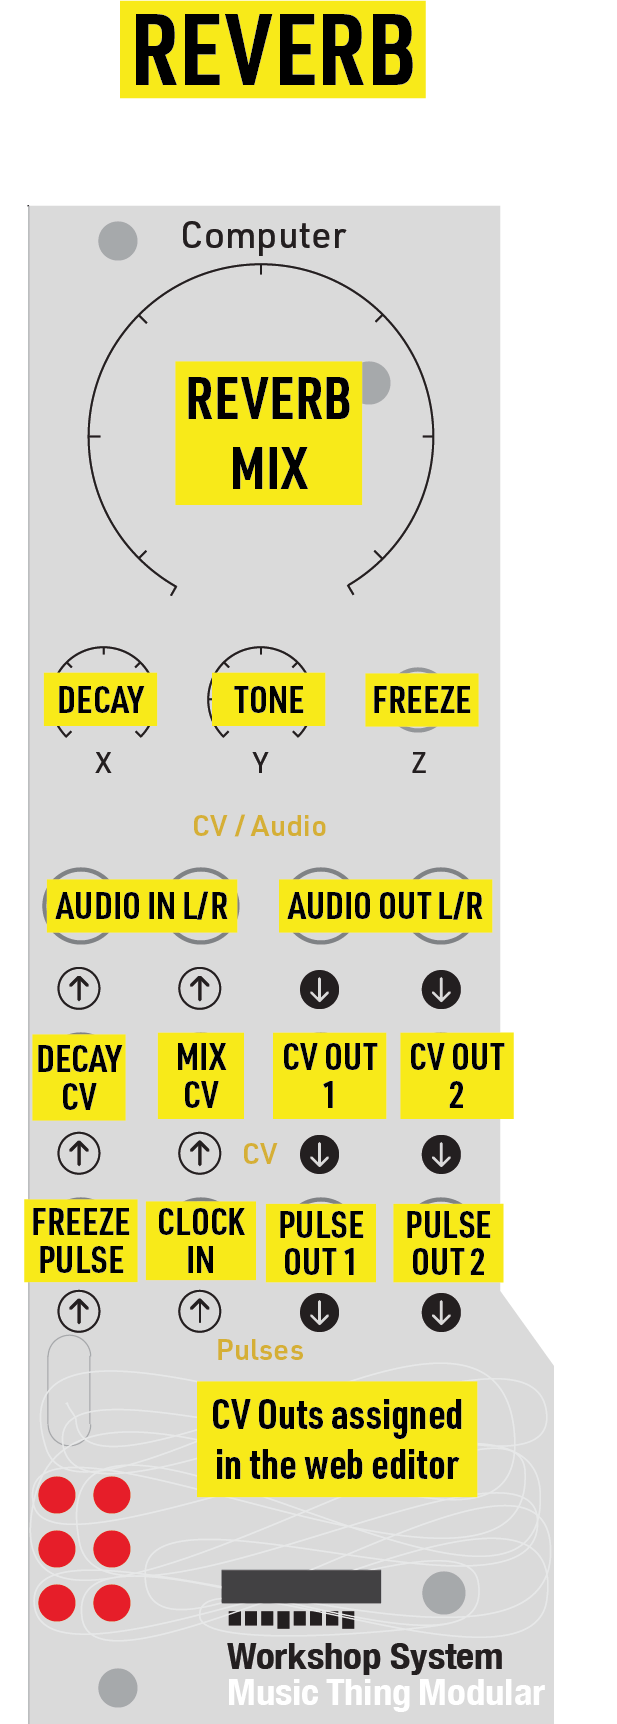
The top row of jacks, the Z switch, and LEDs have fixed functions.
- The top row of jacks are always connected to the reverb inputs and outputs:
- The left audio in and the inverted right audio in are summed to form the (mono) input of the reverb.
- The left and right audio outputs are the stereo reverb output
The Z switch controls a noise gate and reverb ‘freeze’
- When in the up position, the input signal passes directly into the reverberator
- When in the middle position, a noise gate is applied to the combined reverb input, useful for noisy input signals with long periods of silence
- When in the (momentary) down position, the reverb is frozen: the input to the reverb is muted and the reverb decay is extended to infinity
The six LEDs have the following meaning:
- The column of three LEDs on the left show a VU meter for the wet reverb output. Solid illumination of the top LED indicates clipping of the output.
- The top LED of the right column lights when the input signal is clipped.
- Middle-right and bottom-right LEDs show the state of Pulse Out 1 and Pulse Out 2, respectively.
Configuring Reverb+ ←
The remaining eight jack sockets and three knobs on the Computer have their function set through the configuration editor.
A new Reverb+ card is set up with this default configuration:
- Main Knob: sets reverb wet/dry balance
- Knob X: sets reverb decay, from short room-like reverb to near-infinite sustain
- Knob Y: sets reverb tone, adjusting the balance of low and high frequencies in the reverb
- CV in 1: added to Knob X to set reverb decay
- CV in 2: added to Main Knob to set reverb wet/dry balance
- Pulse in 1: high input freezes the reverb
The CV outputs and remaining pulse inputs/outputs are dedicated to various utilities, focused on generation of random CVs:
- Pulse out 1: outputs a short (~2ms) trigger pulse at a fixed 120bpm
- Pulse out 2: output of a Bernoulli gate, that toggles between high and low with a 10% probability at each trigger pulse
- CV out 1: stepped random noise, sampled every other trigger pulse (i.e. 60bpm)
- CV out 2: the analogue output of an 8-step Turing Machine, with 10% chance of flipping each bit
- Pulse in 2: clock input for the Turing Machine
Return to defaults: Holding the Z switch down while turning on or rebooting the card will overwrite any saved configuration with these default settings.
The web configuration editor ←
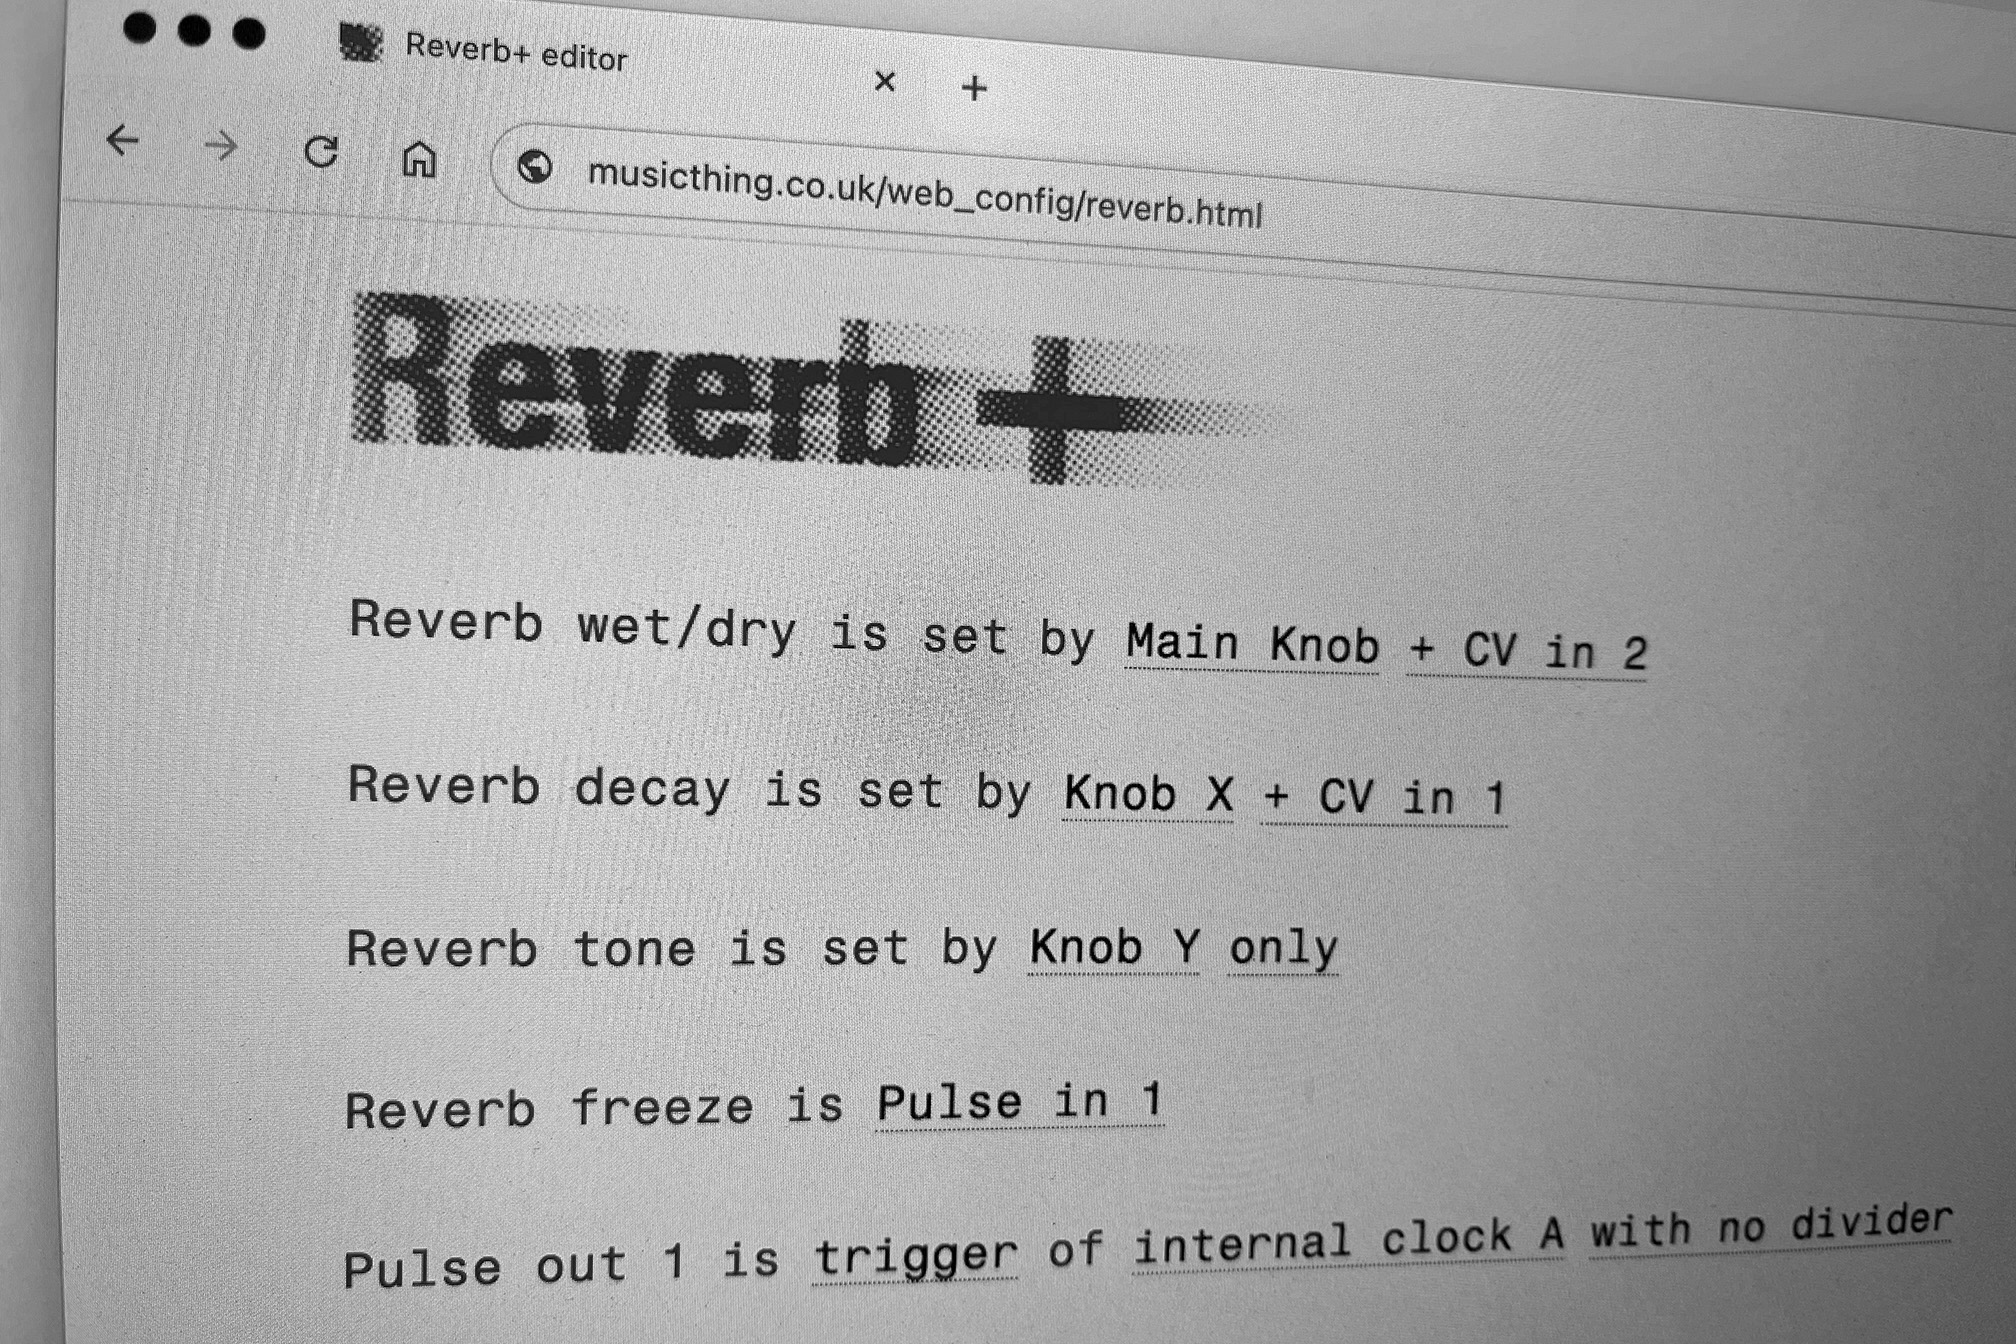
To run the configuration editor, first plug a laptop/desktop computer into the (Workshop System) Computer using a USB cable, and load the editor at musicthing.co.uk/web_config/reverb.html. A browser that supports WebMIDI, such as Google Chrome, is required.
The editor interface is simply a list of sentences describing the functionality of the module, which can be changed by clicking any of the red words. Changing the sentences updates the card functionality immediately, but the new configuration is not saved onto the card until the ‘Save to flash card’ button is pressed.
Eight parameters are controlled by this interface:
- Four reverb settings: wet/dry, decay, tone and freeze
- Pulse outputs 1 and 2
- CV outputs 1 and 2
Additional sentences appear as needed to set options for the internal clocks, Turing Machine or Bernoulli gate.
Configuration notes:
- The configuration interface and MIDI input connect through USB. The Reverb+ card acts as a USB MIDI device (which is connected to USB MIDI host, such as a laptop). On Workshop System Computers made in 2025 onwards (PCB revision >= 1.1), it can also act as a USB MIDI host (connected to a USB MIDI device, such as an Android phone or MIDI controller/keyboard). Such Computers will autodetect the whether the card should act as host or device at power on.
- When in USB host mode, the configuration interface can be accessed through an Android phone or tablet using the Chrome browser. You may need to go to
Android Settings->Default USB Configurationand selectMIDI. Connect the Android device when the Workshop System is powered off, then turn on the Workshop System power.
- When in USB host mode, the configuration interface can be accessed through an Android phone or tablet using the Chrome browser. You may need to go to
- MIDI note pitches use CV output calibration set by the 00 Simple MIDI card.
- Pulse outputs have gate and trigger mode: the trigger mode generates a ~2ms pulse at a rising edge of the chosen gate source, useful for triggering the Slopes module on the Workshop System.
- The clock dividers for each output are independent (not synchronised)
- The Bernoulli Gate is based loosely on Mutable Instruments Branches, and the Turing Machine on the Music Thing Modular module, with similar inputs, outputs and parameters.
Reverb+ Patch Tips ←
- The most straightforward role of the Reverb+ is at both the start and end of the signal chain. CV and gate generation from the Reverb+ modulates analogue filters and oscillators, which feed into the reverb. The stereo reverb outputs are connected to Mix channels 1 and 2, panned hard left and right.
- The Reverb+ is designed to be fed back into itself, with tones ranging from a tonally coloured ‘halo’ around the input signal, through sustained metallic timbres to outright distortion, depending on the amplitude of feedback. Try feedback through both normal and inverting inputs, which may give different tones, or adding filters, ring mod, or other effects into the feedback path.
- Modulation of the Reverb Decay parameter causes a pitch shift, which can be exploited for unusual effects, or even to create melodic patterns.
- CV and gate outputs can be fed back into CV and gate inputs - allowing a S&H triggered by the output of a Bernoulli gate, clocks with randomly varying frequency, self-modulated reverb parameters, etc.
- When the noise S&H is run continuously, the resulting white noise output reaches well into the audible range, useful as an audio source for percussion or subsequent shaping with filters.
- Up to four independent pulse outputs at different frequencies can be generated - useful for exploring polyrhythms and phasing.
88 Blank ←
- The Blank card isn’t actually blank, it’s pre-programmed with a routine that flashes the LEDs as a way to test that the system is working.
- Blank cards can be 2Mb or 16Mb. Potentially, larger cards might be used for programs that need banks of samples or other data.
- The method for programming blank cards is in the FAQ above.
10 Twists ←
by Tom Waters
Download Twists .uf2 file How to install
Instructions: ←
Output - Audio Out 1
Pitch - CV In 1 and/or the big knob
Trigger - Pulse In 1
Timbre - X knob
Color - Y knob
Toggle the switch down to switch between six oscilator shapes
Connect over USB and use the web editor to set the six available shapes from the 47 possibilities
08 Bytebeat ←
by Matt Kuebrich
Download Bytebeat .uf2 file How to install
Launch the Bytebeat Web Editor
Instructions: ←
A program for generating and mangling bytebeats.
There are 36 built-in bytebeat formulas organized into 6 banks of 6, which are indicated by the LEDs. The last 2 banks contain percussive/drum sounds which need to be triggered with Pulse In 1.
Bytebeats can also be “live-coded” through the web interface (bytebeat.html) and saved to 6 “user” slots on the card.
Controls ←
- Main Pot = Sample Rate (Speed)
- Pot X = Bank/Formula Select
- Pot Y = Parameter 1
- Switch Z Up = Built-in Formulas
- Switch Z Middle = User Formulas
- Switch Z Down (momentary) = Reset / Trigger
Inputs ←
- Audio In 1 = Parameter 1 Modulation
- Audio In 2 = Parameter 2 Modulation
- CV In 1 = Formula Select Modulation
- CV In 2 = Sample Rate Modulation
- Pulse In 1 = Reset / Trigger
- Pulse In 2 = Reverse
Outputs ←
- Audio Out 1 = Bytebeat Out
- Audio Out 2 = Next Bytebeat Out
- CV Out 1 = ByteBeat Out (Slow)
- CV Out 2 = ByteBeat Out (Fast)
- Pulse Out 1 = 1Bit Output (Bitbeat)
- Pulse Out 2 = Division of
t(Use as clock for other modules?)
78 Talker ←
Download Talker .uf2 file How to install
Instructions: ←
This is an early proof of concept, which simply babbles random numbers. There is no way yet to control the flow of numbers.
Controls ←
Switch:
- Up = continuous
- Middle = off
- Down = single word
Pitch is controlled by the Main knob + CV in 1 (attenuverted by knob X)
Speed of babbling: Knob Y + CV in 2
Output ←
- Audio out 1: Speech output
- Audio out 2: is the pitched and noise components of the LPC exciter
Input ←
- Audio in 1, if plugged in, replaces the pitched part (only) of the LPC exciter
- CV out 1: exciter amplitude output
- CV out 2: exciter pitch output
